Difference between revisions of "Insert Pictures or Documents"
***** (***** | *****) m |
***** (***** | *****) m |
||
| (21 intermediate revisions by 6 users not shown) | |||
| Line 1: | Line 1: | ||
| − | {{ | + | {{Back to Help Portal}} |
| − | |||
| − | |||
| − | }} | ||
| − | |||
| − | + | = Insert Images and Media = | |
| − | + | ||
| + | |||
| + | = Instructions = | ||
1. Before you can insert any document or picture in your article '''you need to upload the corresponding file''' into the wiki! | 1. Before you can insert any document or picture in your article '''you need to upload the corresponding file''' into the wiki! | ||
| − | + | For instructions on how to upload pictures/documents to energypedia, please see this article: "[[Upload Pictures and Documents|'''Uploading Pictures and Documents''']]" | |
| + | |||
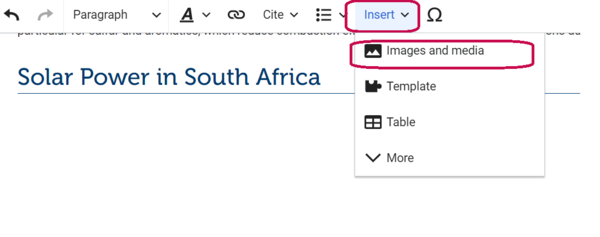
| + | <br/>2. To insert a picture, click on the "'''Insert'''" option in the edit toolbar and on "'''Images and media'''". | ||
| + | |||
| + | [[File:Inserting images and media.png|border|600x600px]]<br />3. A pop-up menu will appear. | ||
| − | + | If you have previously uploaded images to energypedia, you can see them listed in the "'''Search'''" tab. Select the image you want to insert and click____ | |
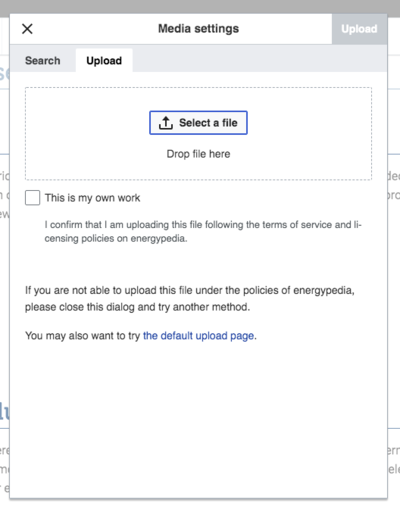
| − | + | Click on the "'''Upload'''" tab and select a file to upload. You can either click on the "Select a file" button or drop the file inside the dotted area. Cross the box "'''this is my own work'''". Then write a description under the file. This method works for images that are our own work. If you want to insert a document or picture from another author you have to follow the process on how to upload pictures and documents (please see this article: "[[Upload Pictures and Documents|'''Uploading Pictures and Documents''']]"). | |
| − | |||
| − | |||
| − | |||
| − | |||
| − | |||
| − | |||
| − | |||
| − | + | [[File:Capture d’écran 2021-09-15 à 16.25.24.png|509x509px]] | |
| − | [[File: | + | |
| − | + | ||
| − | 6. To remove a graph from the article | + | 4. A pop up window titled Media settings will appear. |
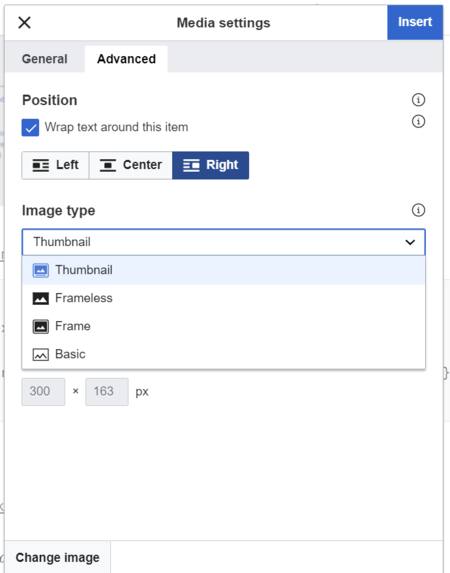
| + | *In the tab labeled "'''Advanced'''" you can set the position, type and size of your image or file. The option "'''Position'''" provides the opportunity to put the image right, left or center of the article. To prevent text from floating around the pictures, use center alignment. | ||
| + | *The option "'''Image size'''" allows you to determine the width of the picture. Please do not use more than 800px as it will result in skewed page. The '''Image type:''' ''frame'' option does not allow you to adjust the picture size. | ||
| + | *In the tab labeled "'''General'''", you can add a caption to your picture. The caption will be displayed below the file when you choose the "'''Image type'''" ''frame'' or ''thumbnail''. If you choose the '''Image type:''' ''border'', then the caption will only be shown when you hover over the picture. <u>'''Please do not use any special character (&;%, /) in the caption.'''</u> | ||
| + | [[File:Link image to a wiki page.png|border|frameless|580x580px|link=https://energypedia.info/wiki/File:Link_image_to_a_wiki_page.png]][[File:Insert file as picture 2.png|border|frameless|573x573px|link=https://energypedia.info/wiki/File:Insert_file_as_picture_2.png]] | ||
| + | |||
| + | |||
| + | 5. To change a picture's height or alignment, you can simply click on the picture and then on "'''Edit'''". | ||
| + | |||
| + | [[File:Editing a picture.png|border|300x300px]] | ||
| + | |||
| + | 6. To remove a picture/graph from the article, select the item and press delete on your keyboard. | ||
<br/> | <br/> | ||
| − | == | + | == Advanced Tips in Wikitext Editor == |
| − | * | + | *To prevent text from floating around the images, use this command after the image : <nowiki><div style="clear: both"></div></nowiki> |
| + | *Visit the following link for more information: https://www.mediawiki.org/wiki/Help:Images | ||
<br/> | <br/> | ||
| − | = | + | = Advanced: Inserting a File as a Picture = |
| + | |||
| + | *___ | ||
| + | *Visit the following link for more information: [https://www.mediawiki.org/wiki/Help:Images https://www.mediawiki.org/wiki/]___ | ||
| − | + | <br/>{{Help Magic Words}} | |
| − | + | [[Category:Help]] | |
Latest revision as of 08:21, 29 March 2023
Insert Images and Media
Instructions
1. Before you can insert any document or picture in your article you need to upload the corresponding file into the wiki!
For instructions on how to upload pictures/documents to energypedia, please see this article: "Uploading Pictures and Documents"
2. To insert a picture, click on the "Insert" option in the edit toolbar and on "Images and media".
If you have previously uploaded images to energypedia, you can see them listed in the "Search" tab. Select the image you want to insert and click____
Click on the "Upload" tab and select a file to upload. You can either click on the "Select a file" button or drop the file inside the dotted area. Cross the box "this is my own work". Then write a description under the file. This method works for images that are our own work. If you want to insert a document or picture from another author you have to follow the process on how to upload pictures and documents (please see this article: "Uploading Pictures and Documents").
4. A pop up window titled Media settings will appear.
- In the tab labeled "Advanced" you can set the position, type and size of your image or file. The option "Position" provides the opportunity to put the image right, left or center of the article. To prevent text from floating around the pictures, use center alignment.
- The option "Image size" allows you to determine the width of the picture. Please do not use more than 800px as it will result in skewed page. The Image type: frame option does not allow you to adjust the picture size.
- In the tab labeled "General", you can add a caption to your picture. The caption will be displayed below the file when you choose the "Image type" frame or thumbnail. If you choose the Image type: border, then the caption will only be shown when you hover over the picture. Please do not use any special character (&;%, /) in the caption.
5. To change a picture's height or alignment, you can simply click on the picture and then on "Edit".
6. To remove a picture/graph from the article, select the item and press delete on your keyboard.
Advanced Tips in Wikitext Editor
- To prevent text from floating around the images, use this command after the image : <div style="clear: both"></div>
- Visit the following link for more information: https://www.mediawiki.org/wiki/Help:Images
Advanced: Inserting a File as a Picture
- ___
- Visit the following link for more information: https://www.mediawiki.org/wiki/___


